Smart tmux sessions with sesh
The way I use Tmux has changed a lot in the last year, so let’s talk about it.
Intro
I rewrote my tmux plugin called ‘t’ in early 2024 into a new cli called sesh, written in Go. It offers more features and performance boosts compared to the original bash version.
Here’s the video that started it all, breaking down the idea of combining zoxide and fzf for a more efficient workflow:
How to install
Instead of using tpm to install it as a tmux plugin, sesh is a binary that you install on your machine using Homebrew or Nix.
Run the following command to install it via homebrew:
brew install joshmedeski/sesh/seshOther installation methods are available on the sesh GitHub page.
How it works
Sesh combines zoxide and tmux sessions to create a powerful and efficient workflow. The two main commands are sesh list to list zoxide records, custom config records, and running tmux Sessions, and sesh connect to connect to a directory and create a Tmux Session.
My YouTuber friend, Dreams of Autonomy, has a great video explaining how zoxide works.
Getting Started
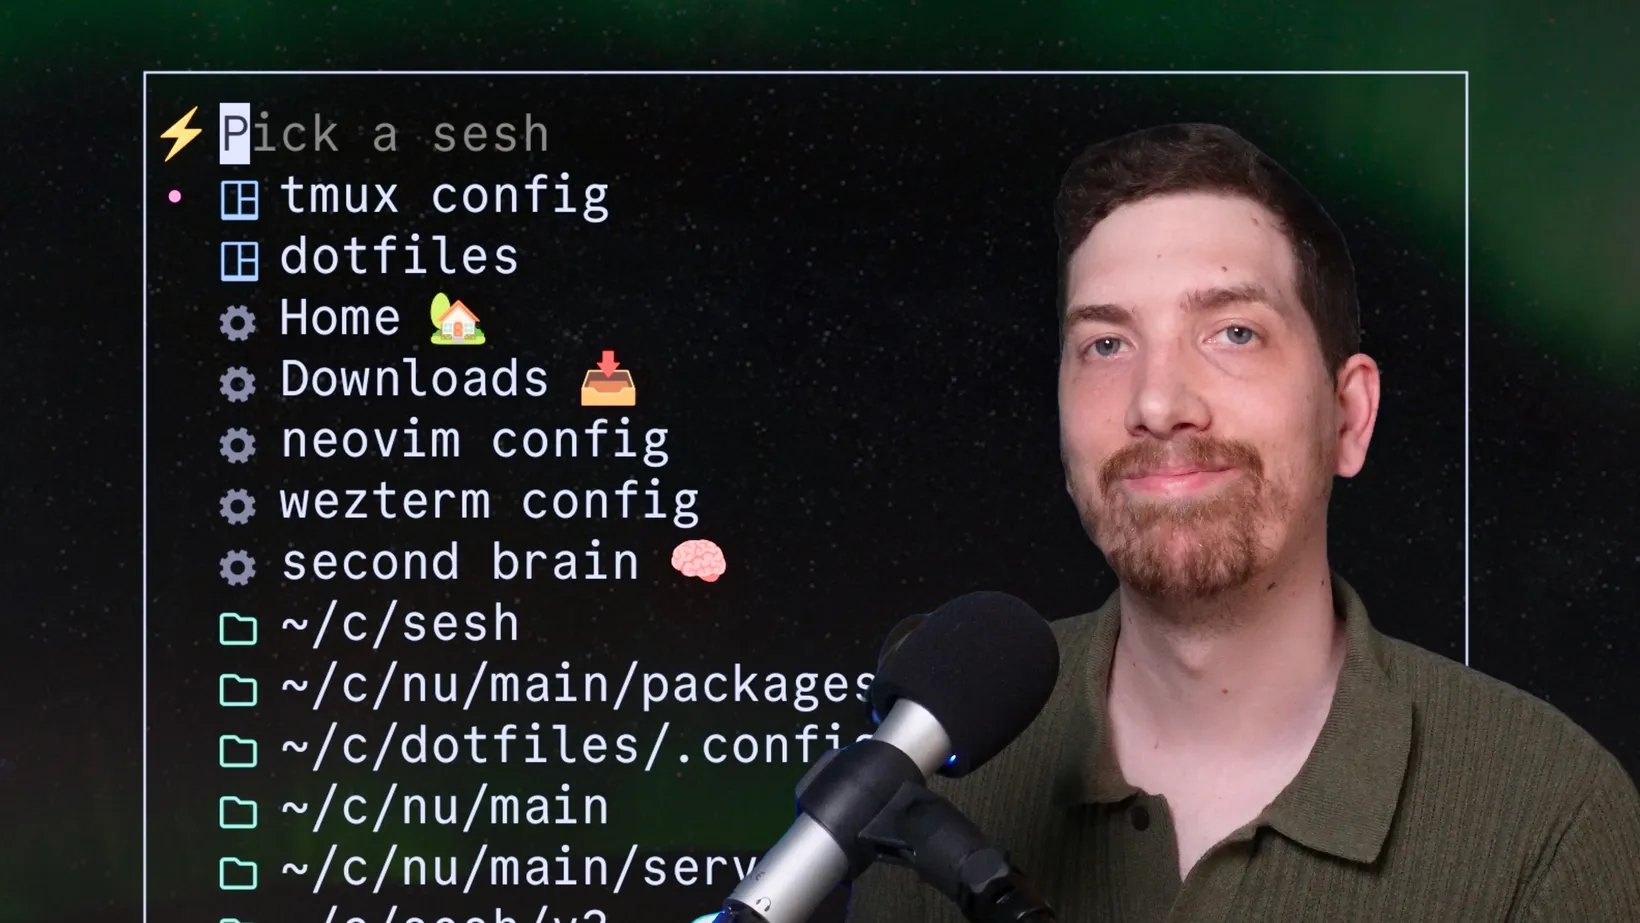
Using sesh connect with sesh list and tools like fzf or gum allows for quick selection and creation of Tmux Sessions based on the chosen project or directory.
sesh connect "$(sesh list | fzf)"I prefer gum as I find it faster and prettier.
sesh connect "$(sesh list -i | gum filter --limit 1 --placeholder 'Pick a sesh' --prompt='⚡')"Startup
Creating custom Tmux Bindings like K displays a pop-up to switch between or create new tmux Sessions on the fly using a keybinding, similar to command palettes in Discord and GitHub.
bind-key "K" display-popup -E -w 40% "sesh connect \"$( sesh list -i | gum filter --limit 1 --placeholder 'Pick a sesh' --prompt='⚡')\""If you want a more complex setup, you can use fzf to add keybindings to filter by category or even take actions like kill tmux sessions from within the popup.
bind-key "J" run-shell "sesh connect \"$( sesh list -i | fzf-tmux -p 55%,60% \ --no-sort --border-label ' sesh ' --prompt '⚡ ' \ --header ' ^a all ^t tmux ^x zoxide ^g config ^d tmux kill ^f find' \ --bind 'tab:down,btab:up' \ --bind 'ctrl-a:change-prompt(⚡ )+reload(sesh list -i)' \ --bind 'ctrl-t:change-prompt(🪟 )+reload(sesh list -it)' \ --bind 'ctrl-g:change-prompt(⚙️ )+reload(sesh list -ic)' \ --bind 'ctrl-x:change-prompt(📁 )+reload(sesh list -iz)' \ --bind 'ctrl-f:change-prompt(🔎 )+reload(fd -H -d 2 -t d -E .Trash . ~)' \ --bind 'ctrl-d:execute(tmux kill-session -t {})+change-prompt(⚡ )+reload(sesh list)')\""macOS keybinding
Binding Sesh to a macOS keybinding like command+K creates a command bar to move between Sessions quickly and easily.
Naming Sessions
Sesh uses the folder name as the session name by default, but can create more contextualized session names based on the directory structure or git work trees.
For example, the ~/c/Downloads directory can be named Downloads in Tmux, while the ~/c/github.com/joshmedeski/sesh directory can be named sesh in Tmux.
In a git repository like ~/c/joshmedeski.com/src/content, sesh will automatically detect the root of the git repository and name the tmux session joshmedeski_com/src/content.
If you’re working with git worktrees, sesh will use the root of the worktree on the session name. So if I’m working with the directory ~/c/sesh/v2 where v2 is a worktree, the session name will be sesh/v2, making it easy to contextualize all sesh wokrtrees in your workflow.
Custom configs
Custom configurations can be created using a toml file in the ~/.config/sesh directory. Sessions can be defined with a location, name, startup command, and startup script to automate actions like opening a file picker or starting a website.
# open the file manager[[session]]name = "Downloads 📥"path = "~/Downloads"startup_command = "yazi"
# open a file[[session]]name = "tmux config"path = "~/c/dotfiles/tmux"startup_command = "nvim tmux.conf"
# run a script to startup a node project[[session]]path = "~/c/joshmedeski.com"startup_script = "~/.config/sesh/scripts/node_dev"
The script is a executable bash file with some simple tmux commands.
#!/usr/bin/env bashtmux split-window -v -l 10 devtmux select-pane -t :.+tmux send-keys "nvim +GoToFile" EnterYou can also import other toml files if you want to break up your configs.
import = ["~/c/joshmedeski.com/.sesh.toml"]Default Startup
Setting a default startup command like opening NeoVim with a file picker allows for quick access to recently used files whenever switching between sessions and projects for all your projects that don’t have a custom configuration.
[default_session]startup_command = "nvim -c ':Telescope find_files'"Raycast
The sesh companion extension for Raycast makes it easy to use sesh outside of the terminal.
Here are limitations to keep in mind:
- tmux has to be running before you can use the extension
- The extension caches results for a few seconds, so it may not always be up to date

Adding to Zoxide
To make Sesh more useful, it’s important to add records to Zoxide. This can be done by cding into directories or using a shortcut like zad to list and add multiple directories at once.
ls -d */ | xargs -I {} zoxide add {}Wrapping Up
Sesh is a powerful tool that combines zoxide and tmux sessions to create a more efficient workflow. It allows for quick selection and creation of tmux sessions based on the chosen project or directory, and can be customized with custom configurations and startup scripts to automate actions.
Please give it a star and share it with your friends if you find it useful!
Smart session manager for the terminal
Sign-Up for New Posts
Stay in the loop and get the latest blog posts about dotfiles sent to your inbox.
Or use the